Obfuscating native code for fun: Part 1 - Introduction
In this series of posts, I will try to cover all the common knowledge you would need to create your PE bin2bin obfuscator. This year I saw a rise of interest in the topics of software obfuscation and deobfuscation, yet I didn’t see any new open-source projects popping up in public, maybe this series of posts could fix that.
Please note, that all the common things I will talk about here could be applied for the deobfuscation too, but I will mostly focus on the obfuscation.
This is the first part of this series (and hopefully it won’t be the last) where I will cover the common info about obfuscators and will write my own obfuscator that could be a good base for a bin2bin obfuscator.
Preface
There are already quite a lot of open-source native code protectors such as Alcatraz and Perses. However, none of these solutions could be applied as a good base for learners and scaling such projects could be a massive problem, that’s why I decided to do my own thing and maybe it will be way more understandable for the new developers in this niche.
Please also note that while this article is about obfuscation topics, this wasn’t meant for already experienced people in this field. Although all of this is pretty obvious, someone had to explain this to everyone.
The source code of this project can be located on my GitHub.
Abstract info
Who needs this?
A reader with no prior knowledge in this field can pose such a question, the answer is simple if we take into account all the reverse-engineers that will try to crack your software, would it be a game, an extension for Word or anything else. Generally, obfuscation is applied when you don’t want anybody else to understand how your app works internally.
Software obfuscator types
There are two types of software obfuscators.
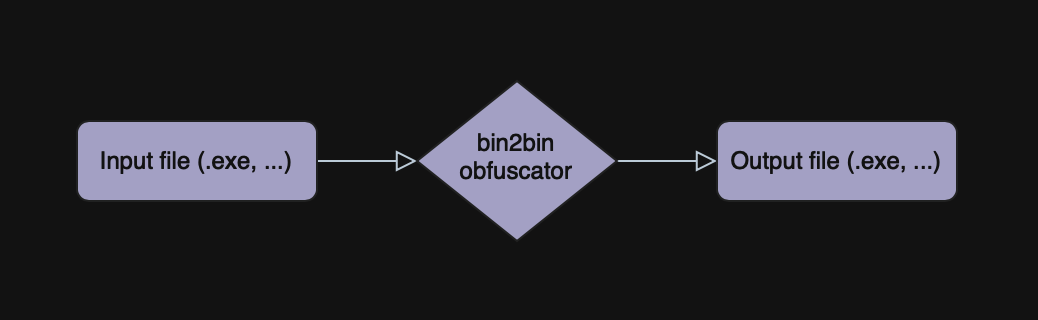
Binary to binary
Or bin2bin for short. As soon as you compile your application with a compiler, on the output you receive a binary, whether it’s an ELF, PE, or any other file. And then, when you need to obfuscate this app you “feed” the obfuscator this binary with additional debug information (MAP, PDB, etc). The obfuscator then does some magic with the binary and on the output, it gives you the obfuscated version of this binary.
A good example of such code protectors could be VMProtect and Themida.
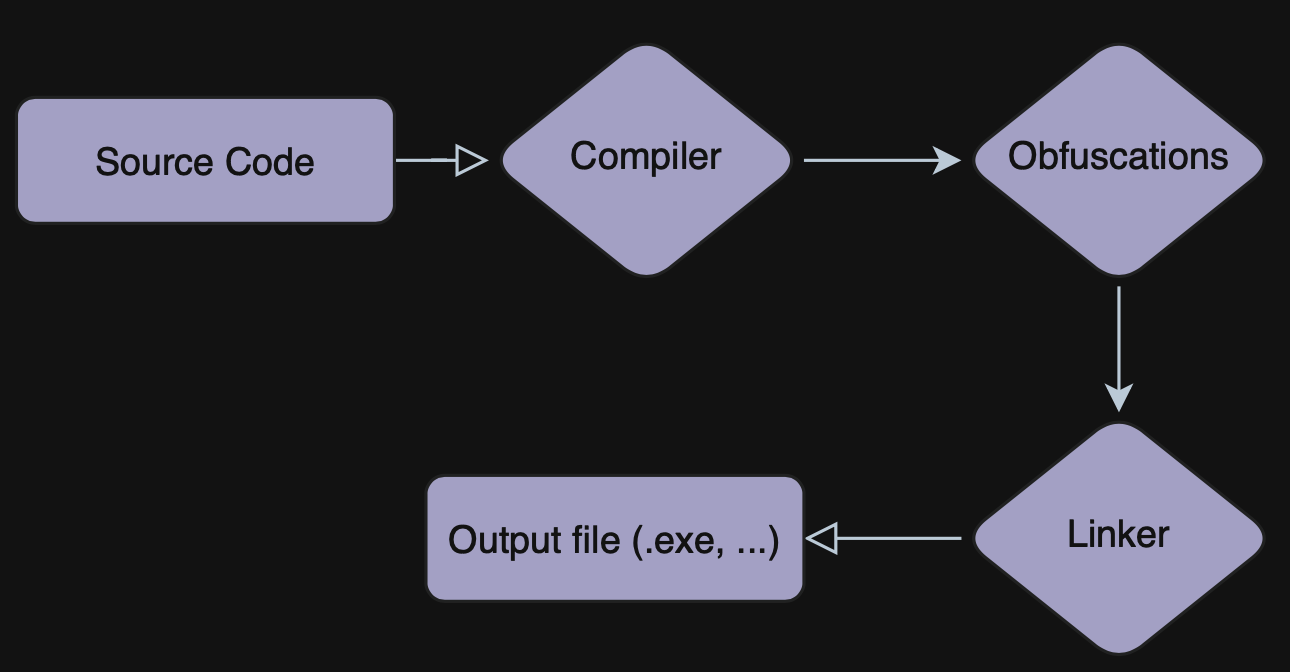
Linker level
An obfuscator that operates at the linker level is most likely an obfuscator that will have way more info about the execution of this code, because of the way how they’re implemented.
It is pretty common to create an LLVM fork and directly modify the LLVM transforms, so that as soon as your function is compiled, but not linked, you can apply the obfuscation.
A good example of such a code protector could be OLLVM.
Portable executable
To implement a bin2bin obfuscator you need to first have a deep understanding of how the executable format works (PE in our case).
Here is a brief overview of the PE file format
Architecture
There are five architectures that PE supports, but we’ll cover only two of them, which are the common ones.
| Architecture | Supported by obfuscator |
|---|---|
| x86_32 (x86) | Yes |
| x86_64 (x64) | Yes |
| ia64 | No |
| arm | No |
| arm64 | No |
Sections
Essentially, the PE file is split into “sections”, which store the raw bytes of data and its protection(for example you can’t just write into the section with code, because its protection allows you only READ/EXECUTE operations).
Typically there are 3 sections in the PE binary that we need to process
| Name | Contains | Protection |
|---|---|---|
.text | Code | Read, execute |
.data | Global data | Read, write |
.rdata | Readonly data | Read |
Relocations
As you may have heard, the operation system could run the code with ASLR to protect the app from some vulnerabilities. Thus, the application that references for example some global vars from the .data section should always dereference the right address for this var.
Relocations in PE are implemented in a way where your code references a pointer to the data with its base set to the default one (which is, stored in the PE header).
Then, as soon as your image gets loaded to the memory, the part of OS that loads your PE images iterates through all the references to the data that it should relocate and changes the base of this reference.
For example, when you reference
mov eax, dword ptr [0x1400000017]
with the default image base set to 0x1400000000, the PE then allocates the image for example at 0x1600000000 and relocates the pointer to
mov eax, dword ptr [0x1600000017]
To do that, the PE stores a relocation table inside of it with all the references, that the OS should process.
However, in x64 applications, the more common way compilers are placing references, instead of such relocations is RIP addressing. It means that instead of placing a direct address to this symbol, it would rather calculate a difference between the current instruction address and the symbol that it needs to reference, and will use this offset. So that you don’t even need to relocate anything!
For example, this is how you would reference an 0x13371337 address:
1336fff9: lea rax, [rip + 0x1337]

; value of rax = 0x1336fff9 + 7 (instruction size) + 0x1337 = 0x13371337
Imports
When you reference for example a WinAPI function Sleep, the compiler does not statically link the implementation of this function within your app, rather it marks in PE that there’s this Sleep function, which is an imported function from user32.dll. When the OS loads this file, it also loads the user32.dll to the memory and updates the address of the Sleep function and our code can reference it.
Implementation
The implementation of my obfuscator is written in C++ 23 and I chose these dependencies:
These dependencies are the only ones that you need to implement all the needed stuff, but to make the development process a bit easier I also added two more libraries:
- magic_enum: A library that adds easier conversions from enum values to their names.
- GTest: A test framework written by Google.
As for the build system, I chose the CMake with cmkr because I also wanted my obfuscator to cross-compile to any architecture and system.
For the static code analysis, I used the clang-format and clang-tidy.
While developing the code analysis and transforms I also implemented a couple of scripts in Python with z3 and graphviz.
PE Loader
This is so far the easiest part, because of how easy it is to use linux-pe.
All I had to do was to implement a file read function and just cast the file start to win::image_t, on top of that, I created a custom wrapper and implemented:
- Architecture check
- PE magic constants checks
- Section parser (+ search)
- Relocations parser (+ editor)
- Codeview70 search (PDB info)
- Section Editor
- Directory parser
- Rebuilder (I will talk about it a bit more later)
All of these are pretty straightforward to implement, if you know what are you doing and I don’t want to go into details about it (for now, at least). In any case, if you’re interested in how I implemented it, you can always check out the source code.
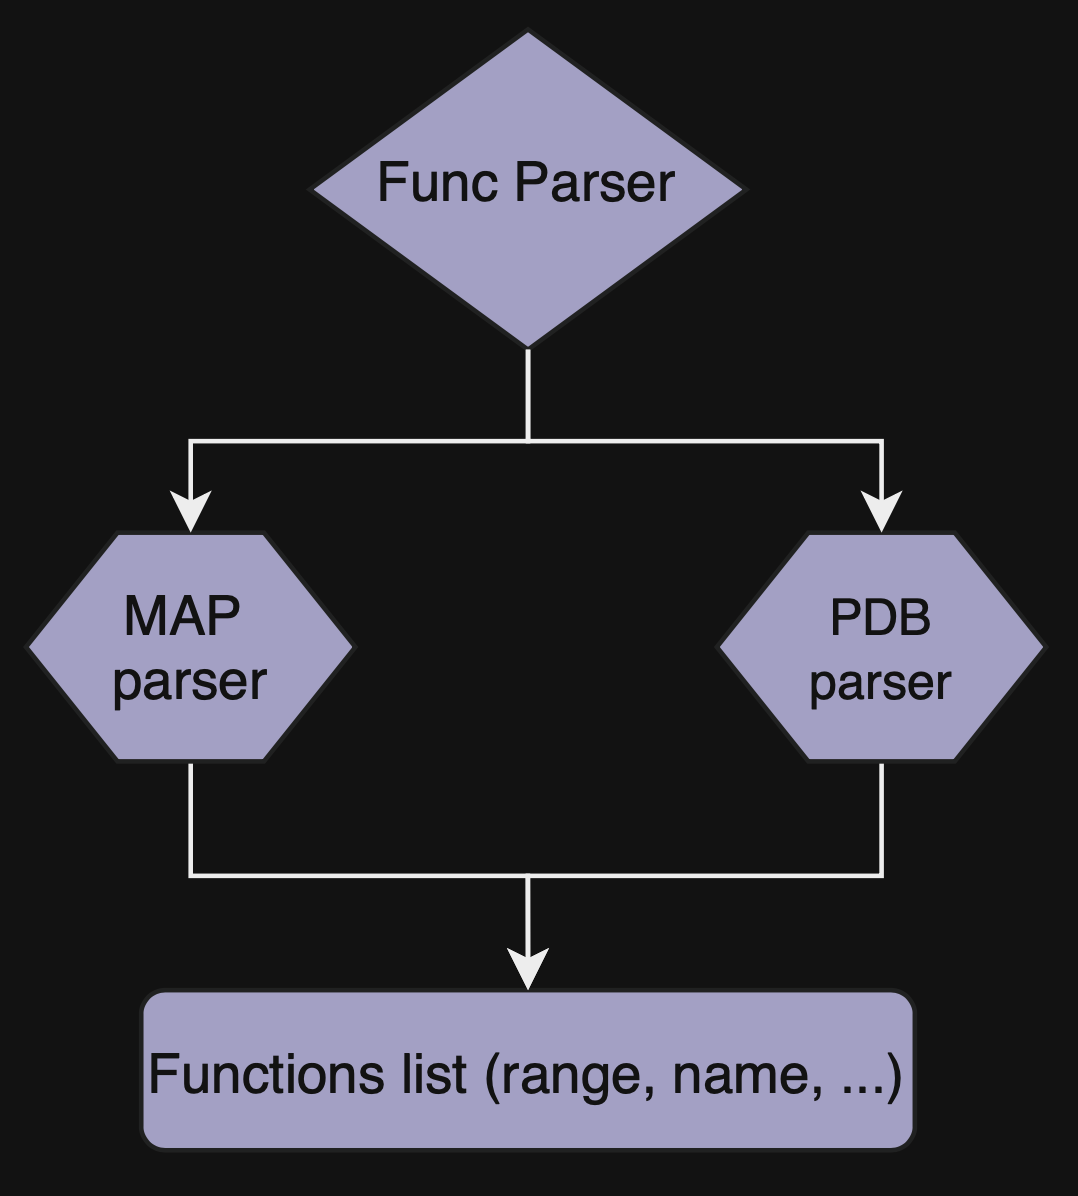
Function parser
Or func_parser, is the module that parses function start/end RVAs from various sources, for now only MAP and PDB files are supported. The only thing that my function parsers lack is the name demangler.
PDB
PDB is the program database format that contains a lot of stuff, somehow this file format is a bit obscure, even though it is pretty common. While I was developing my implementation of the PDB parser I referenced the LLVM Documentation and raw_pdb project.
There are two versions of PDB files, version 2 and version 7. The most common one in 2023 is version 7 and this is the only version that my PDB parser supports.
MAP
There are two versions of MAP files, MSVC version and GCC version. My parser supports only the MSVC version. However, implementing a parser for GCC version is fairly straightforward. If I have time before publishing this article, I will add it.
Disassembling
The library I am using(zasm) supports the disassembling of the x86 code to a single container(zasm::Program), and then assembling instructions from this container back. And to do that I implemented my wrapper for a wrapper. Its name is EbinAsm, easm in short form.
EbinAsm’s purpose is to simplify the usage of the zasm.
Here’s what it’s capable of as of now:
- Program size estimation
- Program assembler
- One-line JMP encoder
- Node cursor (simplify the usages of assembler->setCursor)
- Program instructions info debug dump
- Disasm block of code
- Disasm single instruction
- GP registers converter:
- 32-bit to 64-bit
- 64-bit to 32-bit
- 64-bit to 16-bit
- 64-bit to 8-bit
- JCC/JMP matcher
- RET matcher
- Instruction that affects IP matcher
- JCC/JMP follower
- Operand size calculator
zasm::Regconverter:- to
zasm::x86::Gp - to Root GP
zasm::x86::Gp
- to
- SP matcher
Configuration parser
For now, only CLI arguments are supported as a config provider, but implementing any other sources isn’t such a hard task since they’re implemented in a kinda abstract way. I think at some point I’m gonna implement a .toml config parser.
Transform configuration
Currently, there are three types of transform config var.
Global
Global transform config var is a configuration parameter that should be defined once for all functions. Could store all types of data using the std::any container.
Per function
Technically, this variable functions in the same manner as global configuration variables. However, it resets to its default value at the beginning of each function, necessitating configuration within each function. Alternatively, if you designate this per-function variable as a global variable, the obfuscator will automatically override the default value. This means you have the option to set the variable either individually for each function or just once for all functions. It is capable of storing any type of data within its std::any container.
Shared config
A shared config is a configuration that is common across all transforms. It includes parameters such as the number of times a transform needs to be re-run, the probability of its application, and other similar settings.
Shared config vars are always optional, you can not mark it as required.
This configuration should be configured per each function, but if you pass it as a global var, it would override the default value and this config would be applied for all functions for this transform.
Obfuscator config
A struct that for now contains only the path to the binary that it should protect.
Function parser config
Store options for the MAP/PDB parsers.
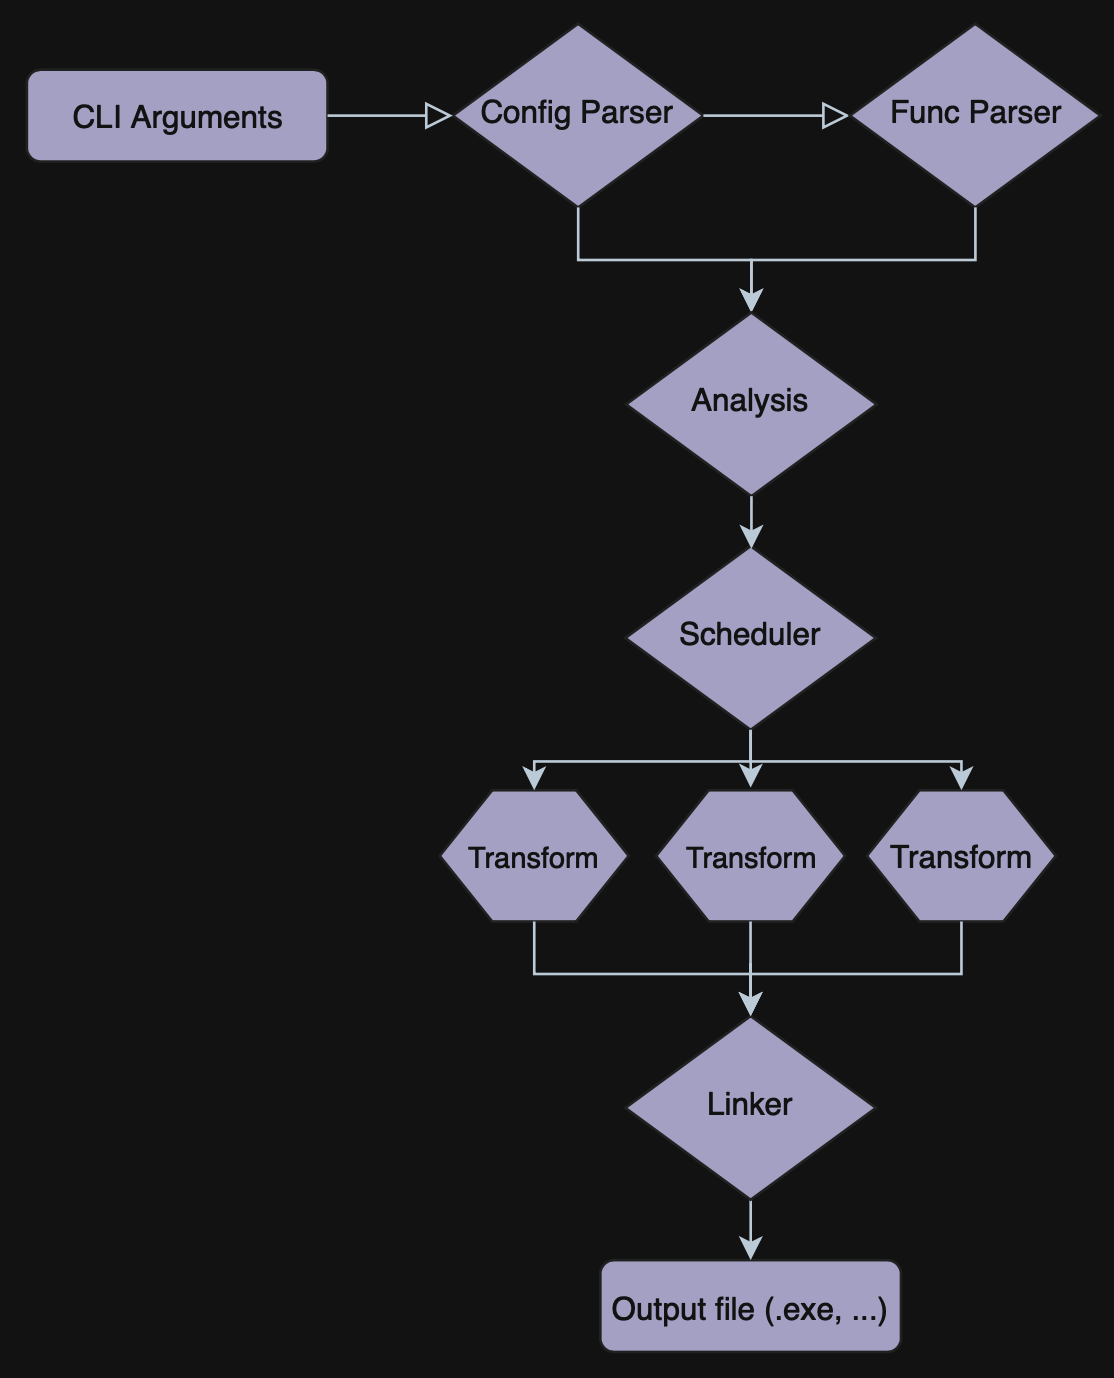
CLI Interface
CLI is implemented in the easiest way it can be implemented.
[  info  ] Available options:
|        [  info  ] -h, --help                   -- This message
|        [  info  ] -pdb         [path]          -- Set custom .pdb file location
|        [  info  ] -map         [path]          -- Set custom .map file location
|        [  info  ] -f           [name]          -- Start new function configuration
|        [  info  ] -t           [name]          -- Start new transform configuration
|        [  info  ] -g           [name]          -- Start new transform global configuration
|        [  info  ] -v           [name] [value]  -- Push value
[  info  ]
[  info  ] Examples:
|        [  info  ] obfuscator hehe.exe -f main -t TransformName -v SomeName 1337
|        [  info  ] obfuscator hehe.exe -f main -t TransformName -v SomeName 1337 -g TransformName -v SomeGlobalName 1337
|        [  info  ] obfuscator hehe.exe -f main -t TransformName -v SomeName 1337 -v SomeName0 1337 -g TransformName -v SomeGlobalName 1337
|        [  info  ] obfuscator hehe.exe -map mymap.map -pdb mypdb.pdb -f main -t TransformName -v SomeName 1337 -v SomeName0 1337 -g TransformName -v SomeGlobalName 1337
Code analysis
Now, when we know the needed configurations and function bounds, we can finally start analyzing the functions that we need to protect.
Code analysis consists of six phases within the Basic Block decomposition and four analysis passes.
Code analysis so far is the most tedious part of this project, although I enjoyed implementing it. It took me a really long time to implement everything I wanted it to do, but some parts of it are still not implemented in the way I want them to work, hopefully, I will get to it in the next parts of this series.
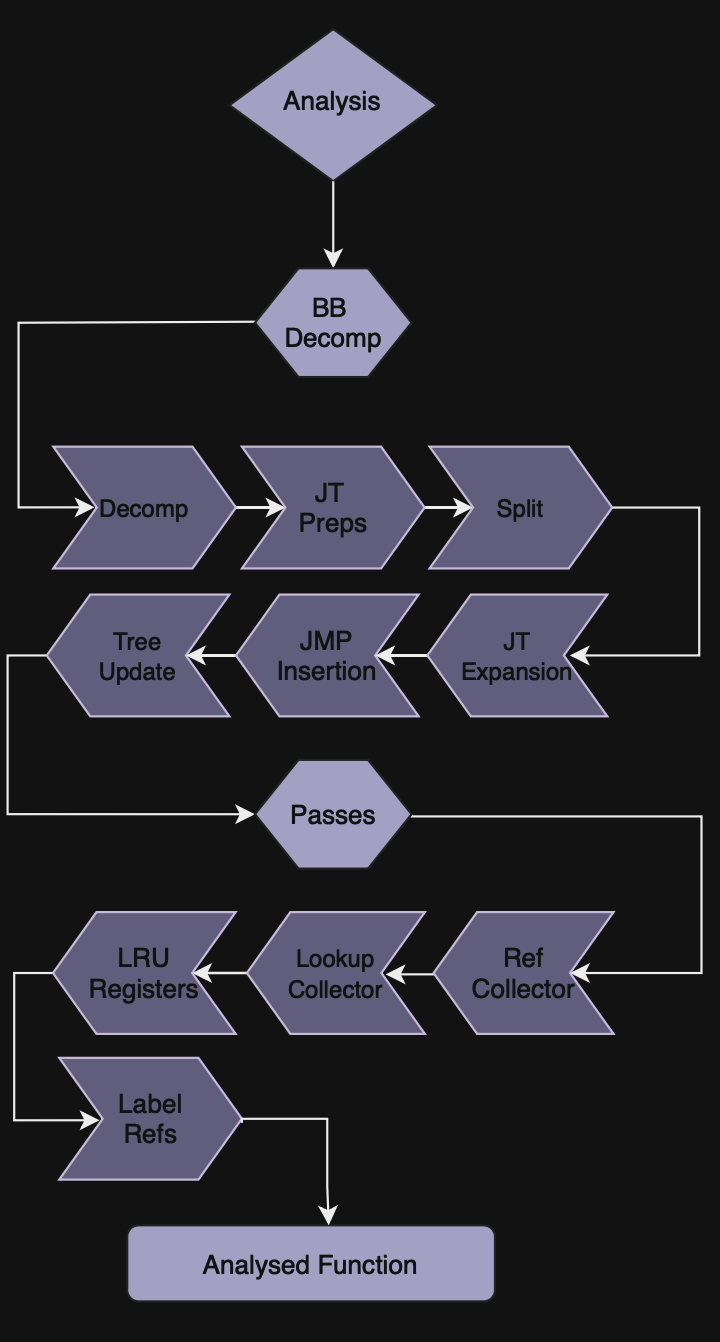
Basic Block decomposition
Basic blocks or BBs are the sequences of instructions in code that have a single entry point and at most two exit points.
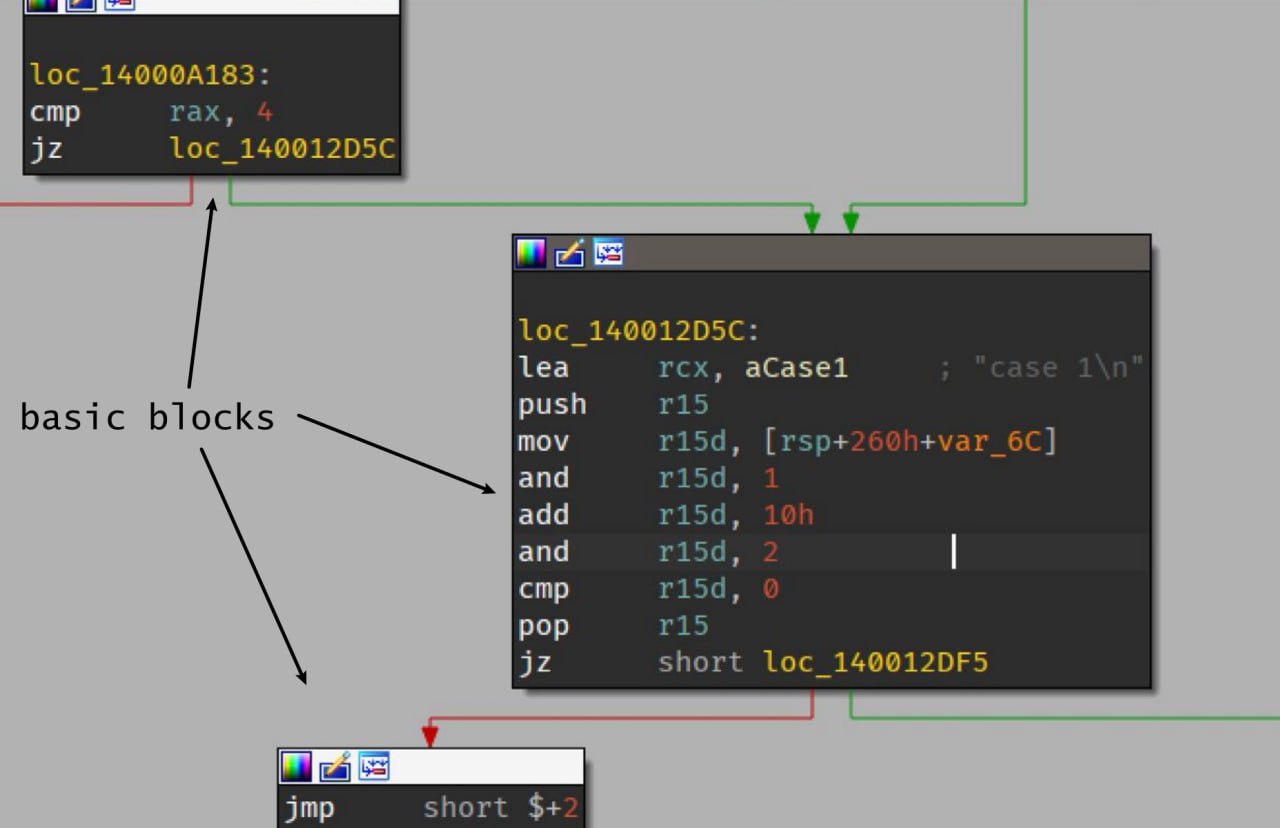
To decompose a basic block we need to disassemble instructions one by one until we hit a JCC/JMP.
At this moment BB decomposition also includes the logic for Jump Tables expansions.
Phase 1: Decomposition
The whole BB decomposition is made in a single recursive function that will assemble a new BB until its end is hit, and then it will start decomposing a new one.
template <pe::any_image_t Img>
std::shared_ptr<bb_t> Instance<Img>::process_bb(const rva_t rva) {
    /// Initialization stuff here ...

    for (std::size_t offset = 0; !is_rva_oob(rva + offset); offset += insn->getLength()) {
        // Decode the instruction
        //
        insn = decoder_.decode_insn_detail(data_start + offset, easm::kDefaultSize, (virtual_address + offset).inner());

        // Saving instruction to the current BB struct
        // If we hit a JCC/JMP, the analysis would start processing it automatically
        //
        const auto insn_desc = push_last_instruction(result, rva + offset, insn->getLength());

        // Finish BB as soon as RET has been hit
        //
        if (easm::is_ret(*insn)) {
            break;
        }

        // Ignoring anything that wouldn't affect IP
        //
        if (!insn_desc->is_jump() && !(insn_desc->flags & UNABLE_TO_ESTIMATE_JCC)) {
            continue;
        }

        // Ending bb as soon as we hit JCC/JMP
        //
        break;
    }
}
Phase 2: JumpTables expansion preparations
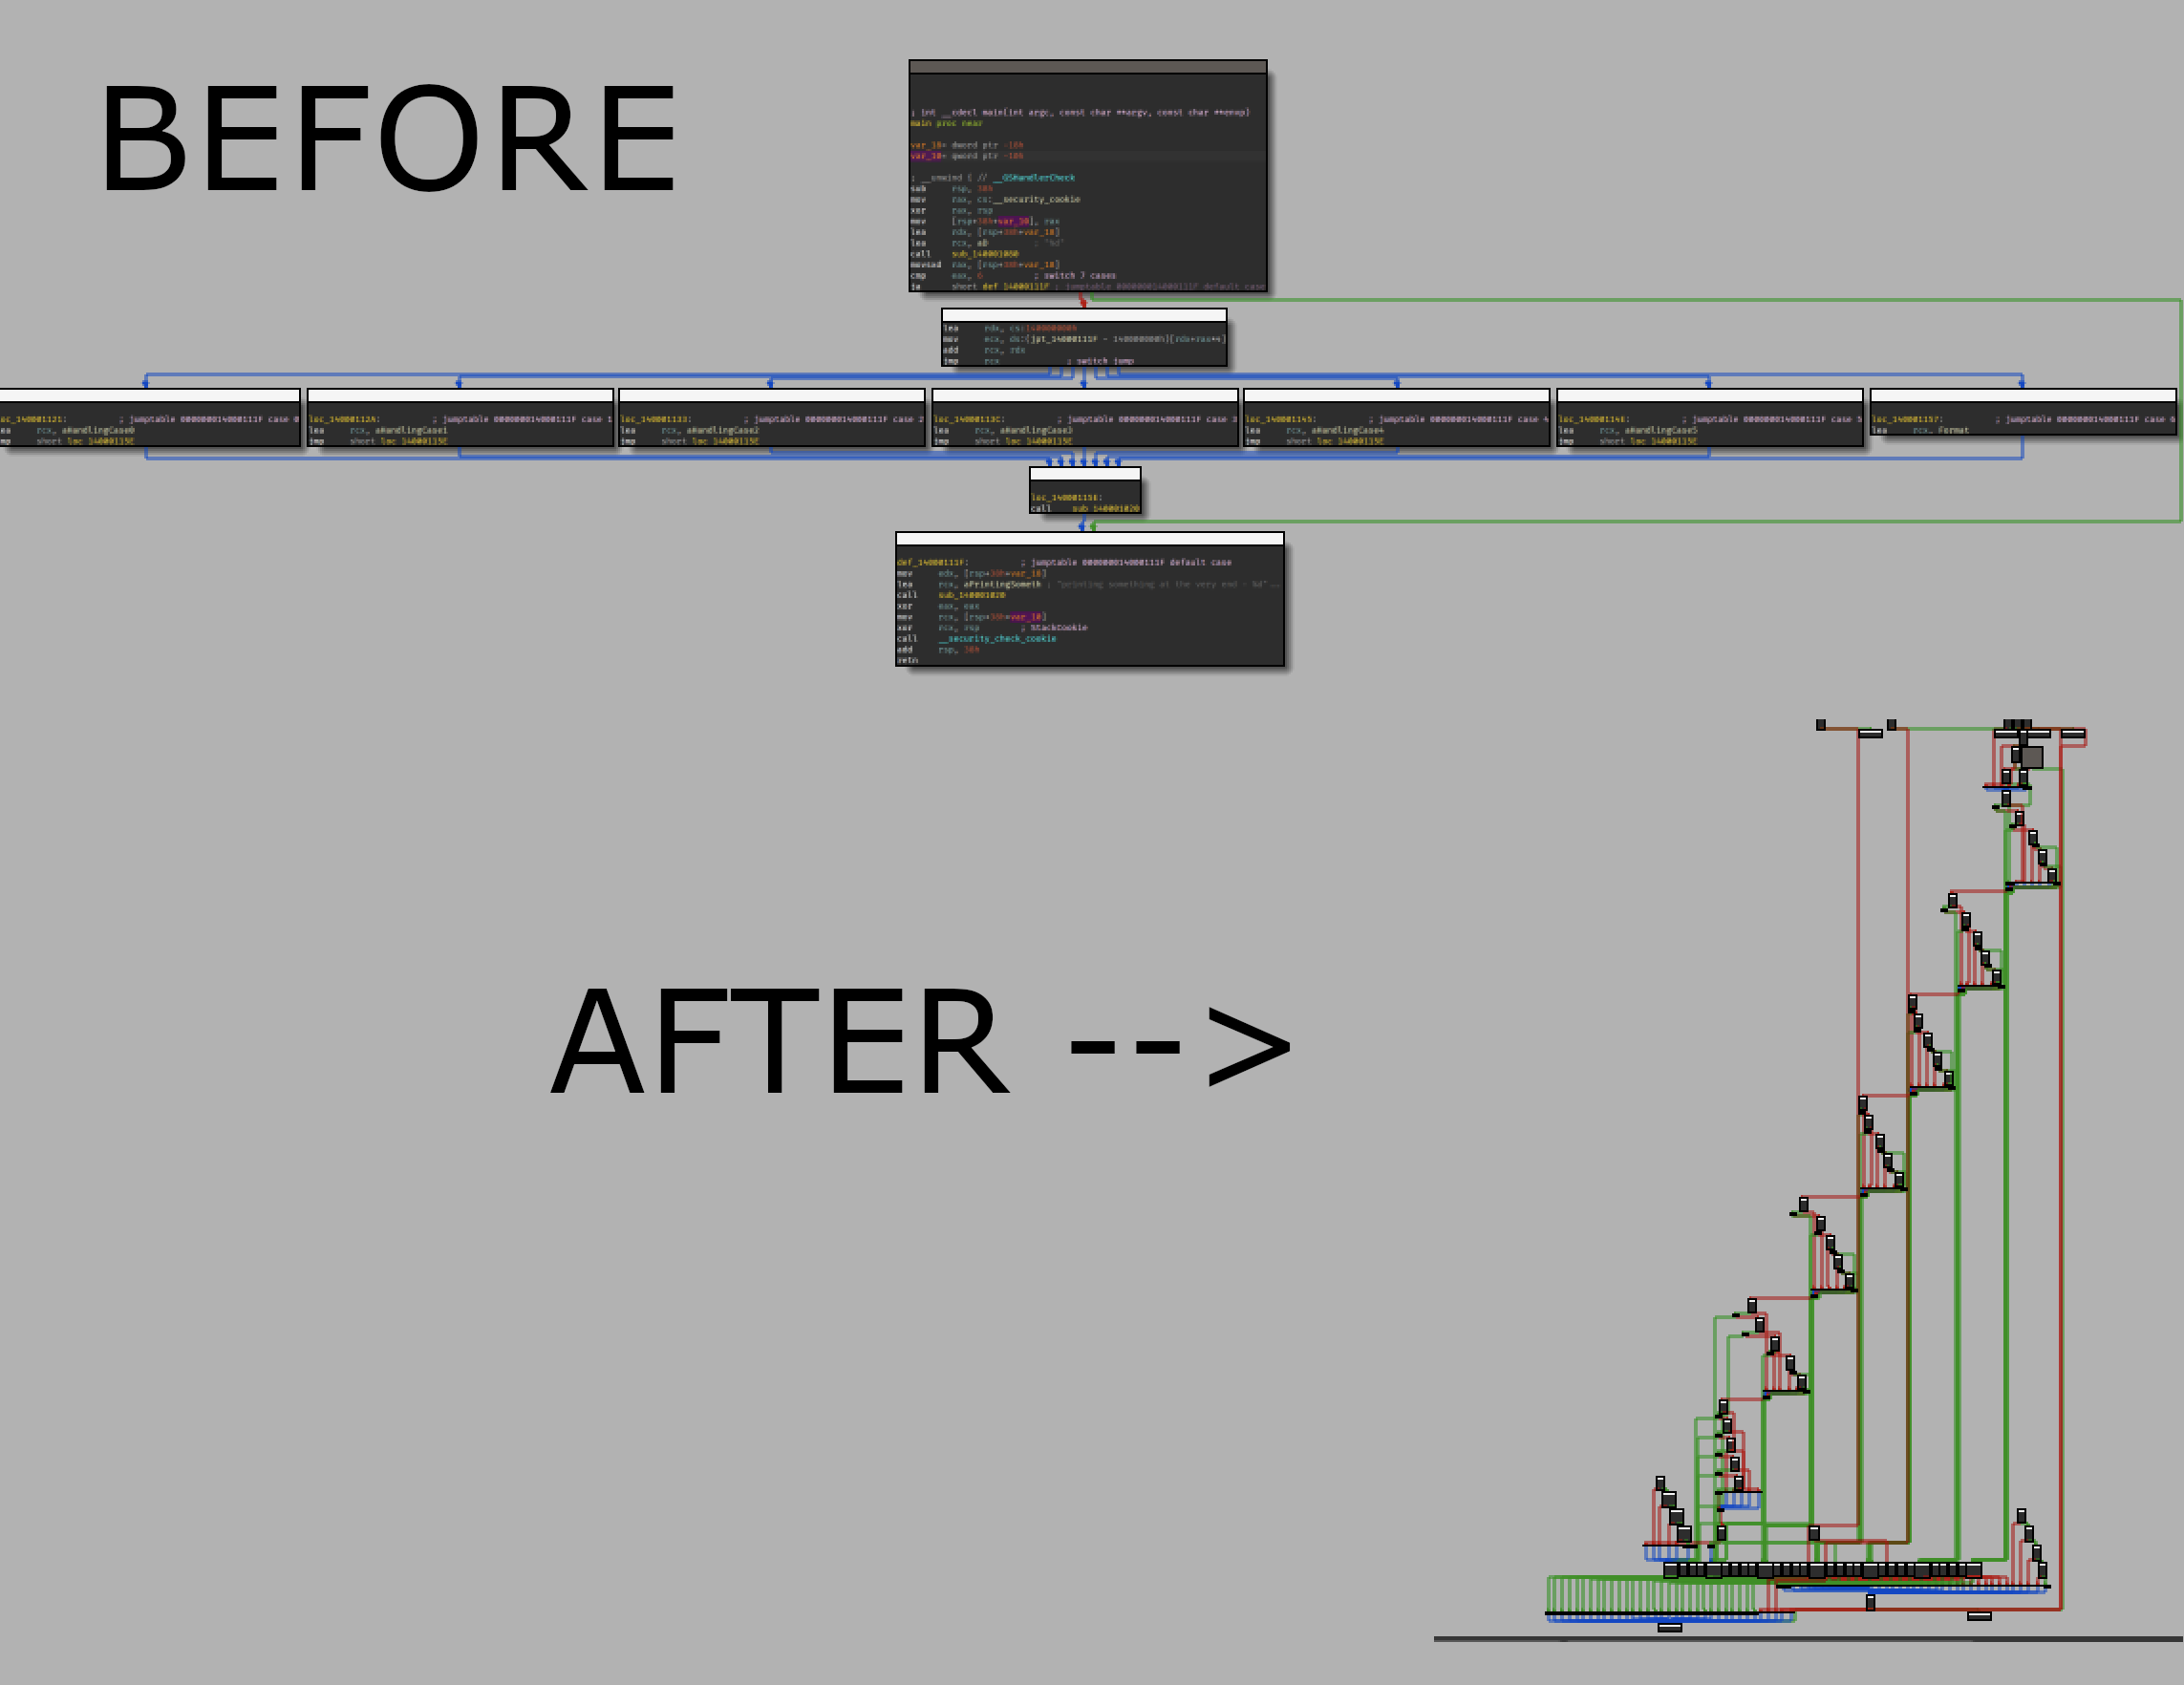
If you don’t know what JumpTables are, essentially when you write a code with a switch, the compiler instead of chaining JZ/JNZ would construct a table with handlers for each case, and use the operand that you pass as an index. Sometimes it could also optimize the expression that you pass and construct some weird expressions with discrete math to generate the index from your argument.
The most common stub for JumpTables looks like this:
cmp     eax, 0x6 ; eax - index
ja      0x140001163 ; jump to default case

lea     rdx, [rel __dos_header] ; base address
mov     ecx, dword [rdx+rax*4+0x1188] ; get the jumptable entry
add     rcx, rdx ; add base (it stores RVAs)
jmp     rcx ; jmp to the branch
So what we need to do, is find the reference to a JumpTable, get its size, remove the JMP instruction and chain JZs instead. Sounds trivial, however, it isn’t as easy as it sounds because as always the hardest things are these small details. Probably this is why Themida still doesn’t support the code with JumpTables in it.
Phase 2-1: JumpTables collector
To expand something, we first need to find something, right? To collect all the JumpTables we are first iterating through all the BBs and looking for instructions where we were unable to estimate the JCC/JMP destination.
We are unable to estimate it because our decomposer doesn’t symbolically execute the code that it’s analyzing, thus it doesn’t know what’s stored in the JMP operand because it’s a register.
Once we find the instruction where we were unable to estimate the next branch, we have to start reverse-iterating all the instructions that we have seen before this one.
While we’re iterating through all the instructions that should be executed before this jump, we have to match for two things:
- The so-called
load_indexinstruction that looks like this, in my example, ismov ecx, dword [rdx+rax*4+0x1188], where the0x1188is the JumpTable start RVA. - And
base_mov, is an instruction that moves the image base to some register that is being in use in theload_indexinstruction.
Phase 2-2: JumpTables size estimation
This part is a bit tricky because normally you’ll see JE/JNE instructions that would check for the JumpTable bounds first. Like this cmp eax, 0x6; ja somewhere in my example.
But the thing is, this instruction would be inserted into binary only when the compiler is not sure that you are handling all cases. This basically means that if you make a switch with 256 entries and compare the uint8_t value (its max value is 0xFF), you will see a stub like this.
lea     rdx, [rel __dos_header] ; base_mov
mov     eax, dword [rdx+rax*4+0x1e08] ; load_index
add     rax, rdx ; add the base
jmp     rax ; jmp to reg
As you can see, there’s no bounds check and thus we can’t relate to this instruction in our code. We need to think of a different approach.
And the easiest approach is to just brute-force its entries. But with just a straight brute force there could potentially be some collisions with the other JumpTables, that we can hit.
So what we have to do is first find all the start addresses of the JumpTables, then brute-force its entries while checking whether we’re hitting an entry from a different JumpTable or not.
The implementation of such an algorithm is quite big so I wouldn’t insert my code snippets for this, it would be much easier to just check the sources.
Phase 3: BB splitting
If you understood how the BB decomposition works, then you may have understood its general flaw. The way it disassembles and decomposes basic blocks linearly would produce multiple duplications of the basic blocks.
Please note, that at this phase there’s also an update_refs job that obfuscator is doing, but it isn’t really related to this, it’s just updating all the instructions references within the analysis stored info, so there’s no point in discussing this, this is just how I’m linking analysis info with the zasm nodes.
For example, for the following code:
mov eax, 1337
je label_1
mov eax, 1234
label_1:
ret
The output basic blocks from the BB decomposer would be like this:
; Basic block 1
mov eax 1337
je label_1

; Basic block 2
ret

; Basic block 3
mov eax, 1234
ret
As you can see, there’s a duplicated BB that contains the same instruction in multiple BBs. This instruction is RET and that’s because we’re following all the branches and defining new BBs if we don’t see any BB that starts at this address.
To fix that, we have to find all the intersections between all the BBs and split them so that we would have basic blocks like this, for the example below:
; Basic block 1
mov eax, 1337
je label_1

; Basic block 2
mov eax, 1234

; Basic block 3
ret
Phase 4: JumpTables expansion and some other analysis shenanigans
Phase 4-1: JumpTables expansion
Now, when we are sure that we’ve already collected all the needed information about JumpTables within the function, we can start expanding them to the chained JZ expressions.
The whole process of this is quite easy, all we have to do is:
- Transform the load_index instruction from
mov ecx, dword [rdx+rax*4+0x1188]tolea ecx, dword [rax*4]so that we would get instead of the case RVA, its offset in the JumpTable - Iterate through all JumpTable entries, then:
- Compare the index
- Analyze the case
- Jump to the newly analyzed BBs from the new case
And in the end, the whole “unwrapped” JumpTable would look as follows:
lea     rax, [rax*4] ; load index
cmp     rax, 0x0 ; case 0
je      0x14000b87b

cmp     rax, 0x4 ; case 1
je      0x14000b872

cmp     rax, 0x8 ; case 2
je      0x14000b869

; ...
Phase 4-2: Rescheduled CF changer info updates
In the analysis module, it collects all the “non-default” CF changes of the instruction and caches it, for example, for the instruction JMP there would be 1 CF changer entry with its type set to JMP, for JE instruction there would be two CF changers, one if the condition is met and one if condition isn’t met.
Thus, at the time of JumpTable expansion, there could be some cases where it was unable to detect this info, and to do this, the analyzer is re-scheduling the update of this info, and we have to update it manually.
Phase 4-3: Splitting BBs
Since after the JumpTable expansions, we added some new basic blocks, we also need to split them in the same way as we did it before
Phase 5: Jmp insertion
After all these JumpTable expansion phases, some fresh new BBs aren’t ending with a jump and their next BBs wouldn’t be the ones, that it expects.
To fix this, we have to iterate through all BBs, check its next nodes and verify that it is the one that it expects, and insert a jump to the right one, if not.
Phase 6: Tree update
In the BB there are two vectors with BB successors and predecessors. After all the analysis phases there could be some invalid data about the successors, and predecessors after we split them.
To make sure that this info is up to date, we need to iterate through all the CF changes and keep track of successors, then after we have the list of successors, we can update the list of predecessors.
Observer
In the zasm library, we can create our custom Observers that would be notified as soon as a new node gets inserted/deleted to the program, by using these callbacks we can append new instructions to the basic blocks.
Due to lack of time implementation of this observer isn’t as proper as it could be, but I’m planning on rewriting it.
Passes
After all of these, the analyzer starts applying analysis passes, there are only five passes as of now.
Pass 1: Image references collector
After we successfully decomposed the function to our custom structs, the references to other parts of this program are just the immediate addresses and/or memory references, which we have to manually resolve, but before resolving anything, we have to collect them first.
So what this pass is doing is it’s just looking for the immediate addresses and tries to check if they’re in the image range, if so, it stores it in the unordered_map.
Pass 2: Collect the lookup table
Store the instructions in an unordered_map with its RVA set as the key.
Pass 3: LRUReg
LRUReg is a mechanism that is implemented within the analysis module. LRU stands for the Least Recently Used, so what it’s doing is it tracks what registers were used recently and updates its cache accordingly. We would use this class later in the transformations.
Generally in programming LRU caching is used to reduce the lifetime of the cache, however, this is not the case why I used this mechanism in my project. Instead, by tracking the least recently used registers we can find what registers were uncommon/common for the analyzed function, thus, in transformations later we could easily generate a “random” register that wasn’t in use by the function.
VarAlloc
VarAlloc is a mechanism that was created along with LRUReg in order to simplify the allocations of variables in the transforms logic.
For example, if in our transform we need to create a variable for some mathematical expression, to do that the only thing we need to do is:
- Create a var alloc instance
auto var_alloc = function->var_alloc();
- Allocate variable
auto var = var_alloc.get_gp32();
- Push its value on the stack
var_alloc.push(assembler);
- Generate math expression
assembler->add(var, zasm::Imm(5)); // var = var + 5
- Restore value from the stack
var_alloc.pop(assembler);
For now, VarAlloc can only allocate variables in registers.
Also, to keep the consistency of the program EFLAGS, VarAlloc also pushes the flags on the stack and restores them afterward. This is not ideal, ideally, the analysis should track what flags are being in use(it already collects what instruction affects what flags) and make sure we wouldn’t override them.
Pass 4: Label references
Now, when we have already collected all the image references, we need to resolve the ones that are within the function and instead of raw addresses, we have to swap the operand to the zasm’s Label. This is needed because when we are going to compile this code back, the addresses won’t be the same and the original function will be overwritten with random bytes. So instead of just raw addresses we would bind the destination to the internal nodes that are stored within the zasm’s program.
Other parts of the core
Mathop
mathop is a math expression generator, short for math operations, designed to emulate various mathematical operations and convert their reverse operations into x86 instructions. mathop currently supports the following operations:
- Add
- Sub
- Inc
- Dec
- Neg
- Not
Adding your own operations to mathop is pretty easy, you have to use 1 macro in .hpp:
/// ^
MATHOP_OPERATION_TWO_OPS(Xor);

/// -
MATHOP_OPERATION_ONE_OP(Neg);
And then implement its logic in a .cpp file:
/// \brief Emulate the math operation under the two operands
/// \param op1 lhs
/// \param op2 rhs
/// \return emulated result
ArgumentImm Xor::emulate(ArgumentImm op1, std::optional<ArgumentImm> op2) const {
    ArgumentImm result;
    std::visit(
        [&]<typename Ty>(Ty&& op1_value) -> void { //
            result.emplace<std::decay_t<Ty>>(op1_value ^ std::get<std::decay_t<Ty>>(*op2));
        },
        op1);
    return result;
}

/// \brief Lift the revert operation for this math operation
/// \param assembler zasm assembler
/// \param operand dst operand
/// \param argument optional rhs
void Xor::lift_revert(zasm::x86::Assembler* assembler, zasm::x86::Gp operand, std::optional<Argument> argument) const {
    lift(
        argument, detail::none,
        [assembler, operand](const zasm::x86::Gp reg) -> void { //
            assembler->xor_(operand, reg);
        },
        [assembler, operand](const zasm::Imm imm) -> void { //
            assembler->xor_(operand, imm);
        });
}

/// \brief Generate a random second operand
/// \param lhs Operand 1
/// \return Generated operand
ArgumentImm Xor::generate_rhs(const ArgumentImm lhs) const {
    return detail::generate_random_argument_in_range(lhs);
}
mathop can generate the RHS values for the operations, also it supports the zasm registers passed as the LHS/RHS and operate on their values (only for lifting).
I am planning on expanding mathop, adding lifters for not only revert operations and some other things. But for now, it will do its job.
Transforms design
Transform or transformation could be treated in the same way as optimization passes in compilers, although instead of optimizing code they instead obfuscate it. For example, obfuscation transform could replace a+b operation with a-(-b) in order to make the code harder to understand.
Let’s break down how would you add your own transformations to the obfuscator.
First, you need to create a .hpp file and decide where you would apply your transformations, it could be one(or multiple) of:
For example, let’s create a basic block transform that would add an NOP instruction at the beginning of each basic block.
Implementing our own transform
To do that, we have to derive the transformation from BBTransform class:
template <pe::any_image_t Img>
class Nops final : public BBTransform<Img> {
public:

};
Then, implement the abstract method that actually applies the transformation.
template <pe::any_image_t Img>
class Nops final : public BBTransform<Img> {
public:
    /// \brief Transform basic block
    /// \param ctx Transform context
    /// \param function Routine that it should transform
    /// \param bb BB that it should transform
    void run_on_bb(TransformContext& ctx, Function<Img>* function, analysis::bb_t* bb) override {
        //
    }
};
Nice. Now we need to add the NOP instruction, to do that we have to get the assembler whose cursor is set to the beginning of the BB and call the nop function from the assembler object.
template <pe::any_image_t Img>
class Nops final : public BBTransform<Img> {
public:
    /// \brief Transform basic block
    /// \param ctx Transform context
    /// \param function Routine that it should transform
    /// \param bb BB that it should transform
    void run_on_bb(TransformContext& ctx, Function<Img>* function, analysis::bb_t* bb) override {
        /// or `cursor->before(bb->instructions.at(0)->node_ref)`
        auto* assembler = function->cursor->before(bb->node_at(0)).value();
        assembler->nop();
    }
};
Now, the implementation of this transform is finished, but we also have to push it to the scheduler list, to do that we need to open the obfuscator/transforms/startup.cpp file and add it there
void startup_scheduler() {
    auto& scheduler = TransformScheduler::get();

    scheduler.register_transform<transforms::ConstantCrypt>();
    scheduler.register_transform<transforms::Substitution>();
    scheduler.register_transform<transforms::BogusControlFlow>();
+   scheduler.register_transform<transforms::Nops>();
}
This is it! Transform is finished, but maybe we also need to add some variables that could be set for this transform. Something like a counter how many nops do we need to insert?
To do that, we need to override the init_config method and initialize our vars there.
/// \brief Optional callback that initializes config variables
void init_config() override {
    this->mode = &this->new_var(
        0, // unique index
        "mode", // name
        false, // is_required
        TransformConfig::Var::Type::PER_FUNCTION, // type
        1 // default_value
    );
    mode->short_description("counter goes brr");
}
And to use it afterward all we have to do is call its ->template value function.
/// \brief Transform basic block
/// \param ctx Transform context
/// \param function Routine that it should transform
/// \param bb BB that it should transform
void run_on_bb(TransformContext& ctx, Function<Img>* function, analysis::bb_t* bb) override {
    /// or `cursor->before(bb->instructions.at(0)->node_ref)`
    auto* assembler = function->cursor->before(bb->node_at(0)).value();
    // or this->get_var(0/*index */).template value<int>()
    for (std::size_t i = 0; i < mode->value<int>(); ++i) {
        assembler->nop();
    }
}
Advanced Usage
It is also possible to make a transform for more than one type of data at once.
Each transform, besides the shared/non-shared configurations, also has a so-called FeaturesSet. This mechanism is needed for identifying what transforms implement what callbacks so that we wouldn’t loop through unnecessary data. It means that transform can implement multiple callbacks at the same time.
For example, I want to transform both Function and Basic Blocks from a single transform.
To do that, we need to derive the Transform root class and fill the features set manually.
template <pe::any_image_t Img>
class Nops final : public Transform<Img> {
public:
    /// \brief Callback that initializes `features_set_`
    void init_features() override {
        this->feature(TransformFeaturesSet::Index::HAS_FUNCTION_TRANSFORM, true);
        this->feature(TransformFeaturesSet::Index::HAS_BB_TRANSFORM, true);
    }

    /// \brief Optional callback that initializes config variables
    void init_config() override {
        // ... initializing config
    }

    /// \brief Transform routine
    /// \param ctx Transform context
    /// \param function Routine that it should transform
    void run_on_function(TransformContext& ctx, Function<Img>* function) override {
        // doing something with function here
    }

    /// \brief Transform basic block
    /// \param ctx Transform context
    /// \param function Routine that it should transform
    /// \param bb BB that it should transform
    void run_on_bb(TransformContext& ctx, Function<Img>* function, analysis::bb_t* bb) override {
        // doing something with BB
    }

    /// Other callbacks you can subscribe to
    void run_on_node(TransformContext& ctx, Function<Img>* function, zasm::Node* node) override {}
    void run_on_insn(TransformContext& ctx, Function<Img>* function, analysis::insn_t* insn) override {}
};
Available info within the transforms
From the transform callbacks, you can access information:
- Function
- Basic Block
- Instruction
- (optional) RVA
- (optional) length in bytes
- zasm instruction reference
- zasm Node reference
- Attached basic Block reference
- Control flow changes info
- Type:
JCC_CONDITION_METJCC_CONDITION_NOT_METJMP
- Destination BB
- Type:
- Relocations info
- Type:
HEADERIP
- Immediate value RVA
- Offset from instruction
- Type:
- Internal analysis flags
- Flags:
- Type:
set_0set_1modifiedtestedundefined
- Values:
- CF (Carry Flag)
- PF (Parity Flag)
- AF (Adjust Flag)
- ZF (Zero Flag)
- SF (Sign Flag)
- TF (Trap Flag) - for single stepping
- IF (Interrupt Enable Flag)
- DF (Direction Flag)
- OF (Overflow Flag)
- IOPL1 (I/O Privilege Level flag, first bit)
- IOPL2 (I/O Privilege Level flag, second bit)
- NT (Nested Task Flag)
- RF (Resume Flag) - used to control the processor’s response to debug exceptions
- VM (Virtual 8086 Mode Flag)
- AC (Alignment Check or Access Control Flag)
- VIF (Virtual Interrupt Flag)
- VIP (Virtual Interrupt Pending)
- ID (ID flag) - indicates if CPUID instruction can be used
- Type:
(probably I forgot to mention something as there is really a lot of info)
Transform scheduling
Transformations are stored per architecture, so if you need to add transform only x86 or only x64 code - you absolutely can do that.
Scheduling
Each transform has its unique size_t identifier, which is computed at the compilation time using some cpp __FUNCSIG__ magic.
After the config was parsed, we need to actually schedule the transforms, and to do that, we have an interface to search through all transforms using their name and/or size_t identifier.
Also worth mentioning is that transforms would be applied in the same order as you enable them.
Applying
Since we have four transform callbacks, we have to iterate through all the things exactly four times. You may think that the iterations through nodes/instructions/bbs could be optimized and done only once, but you would be wrong, as that would break the appliance order
For each callback, the obfuscator creates a new TransformContext instance. For now, context only has a rerun_me var, that you can set to true in your callback and the obfuscator would re-run this callback.
Transforms
Now that we’ve finished with all the analysis phases, it’s finally time to discuss the multiple transforms that I implemented.
Bogus control flow
An obfuscation that inserts an opaque predicate to the Basic Block thus creates a second “dummy” successor branch of the Basic Block, that will never be executed.
An opaque predicate is an expression that would always be evaluated to one result. To generate these opaque predicates I chose a weird approach.
To be precise, I used z3 to generate tautologies. This is not ideal and all of these generated tautologies in the end are mostly discarding bits, but it was a nice thing to implement.
To generate a tautology my script has a set of operations that it could apply on a uint32_t value, then it checks whether there are values that would produce different results.
Since these expressions are mostly discarding bits, most of the decompilers could easily optimize these expressions. I have a couple of mitigations that I could imply for it and how to modify the generator script for the next parts of the series.
Sample output that I used and converted for zasm’s assembler:
((x << 16) & 6) == 0
((x & 16) & 7) == 0
(((x + 2) << 4) & 6) == 0
(((x + 6) & 3) & 12) == 0
(((x << 9) << 1) & 4) == 0
(((x << 3) & 4) + 4) == 4
(((x << 1) & 1) << 9) == 0
(((x << 16) & 6) & 6) == 0
(((x << 2) & 2) ^ 2) == 2
(((x << 9) ^ 11) & 11) == 11
// ...
There is also a mode variable that I added, which could also instead of generating opaque predicates generate a math expression using mathop, check for a random value and make two identical BBs. This will result in semantically the same code execution, although the output in decompilers would look quite messy because it would treat them as different paths of code, although they’re doing the same thing.
Substitution
An obfuscation that transforms a math expression, to its equivalent that could look a bit more confusing for the reverse engineer.
A good example of such transformation is an expression x + y that would be then transformed to x - (-y)
A good thing about this transform is that we can run it multiple times and each time it would obscure the expressions even more.
So far implemented substitutions are:
- x + y = x - (-y)
- x - y = x + (-y)
- x & y = ((x ^ ~y) & x)
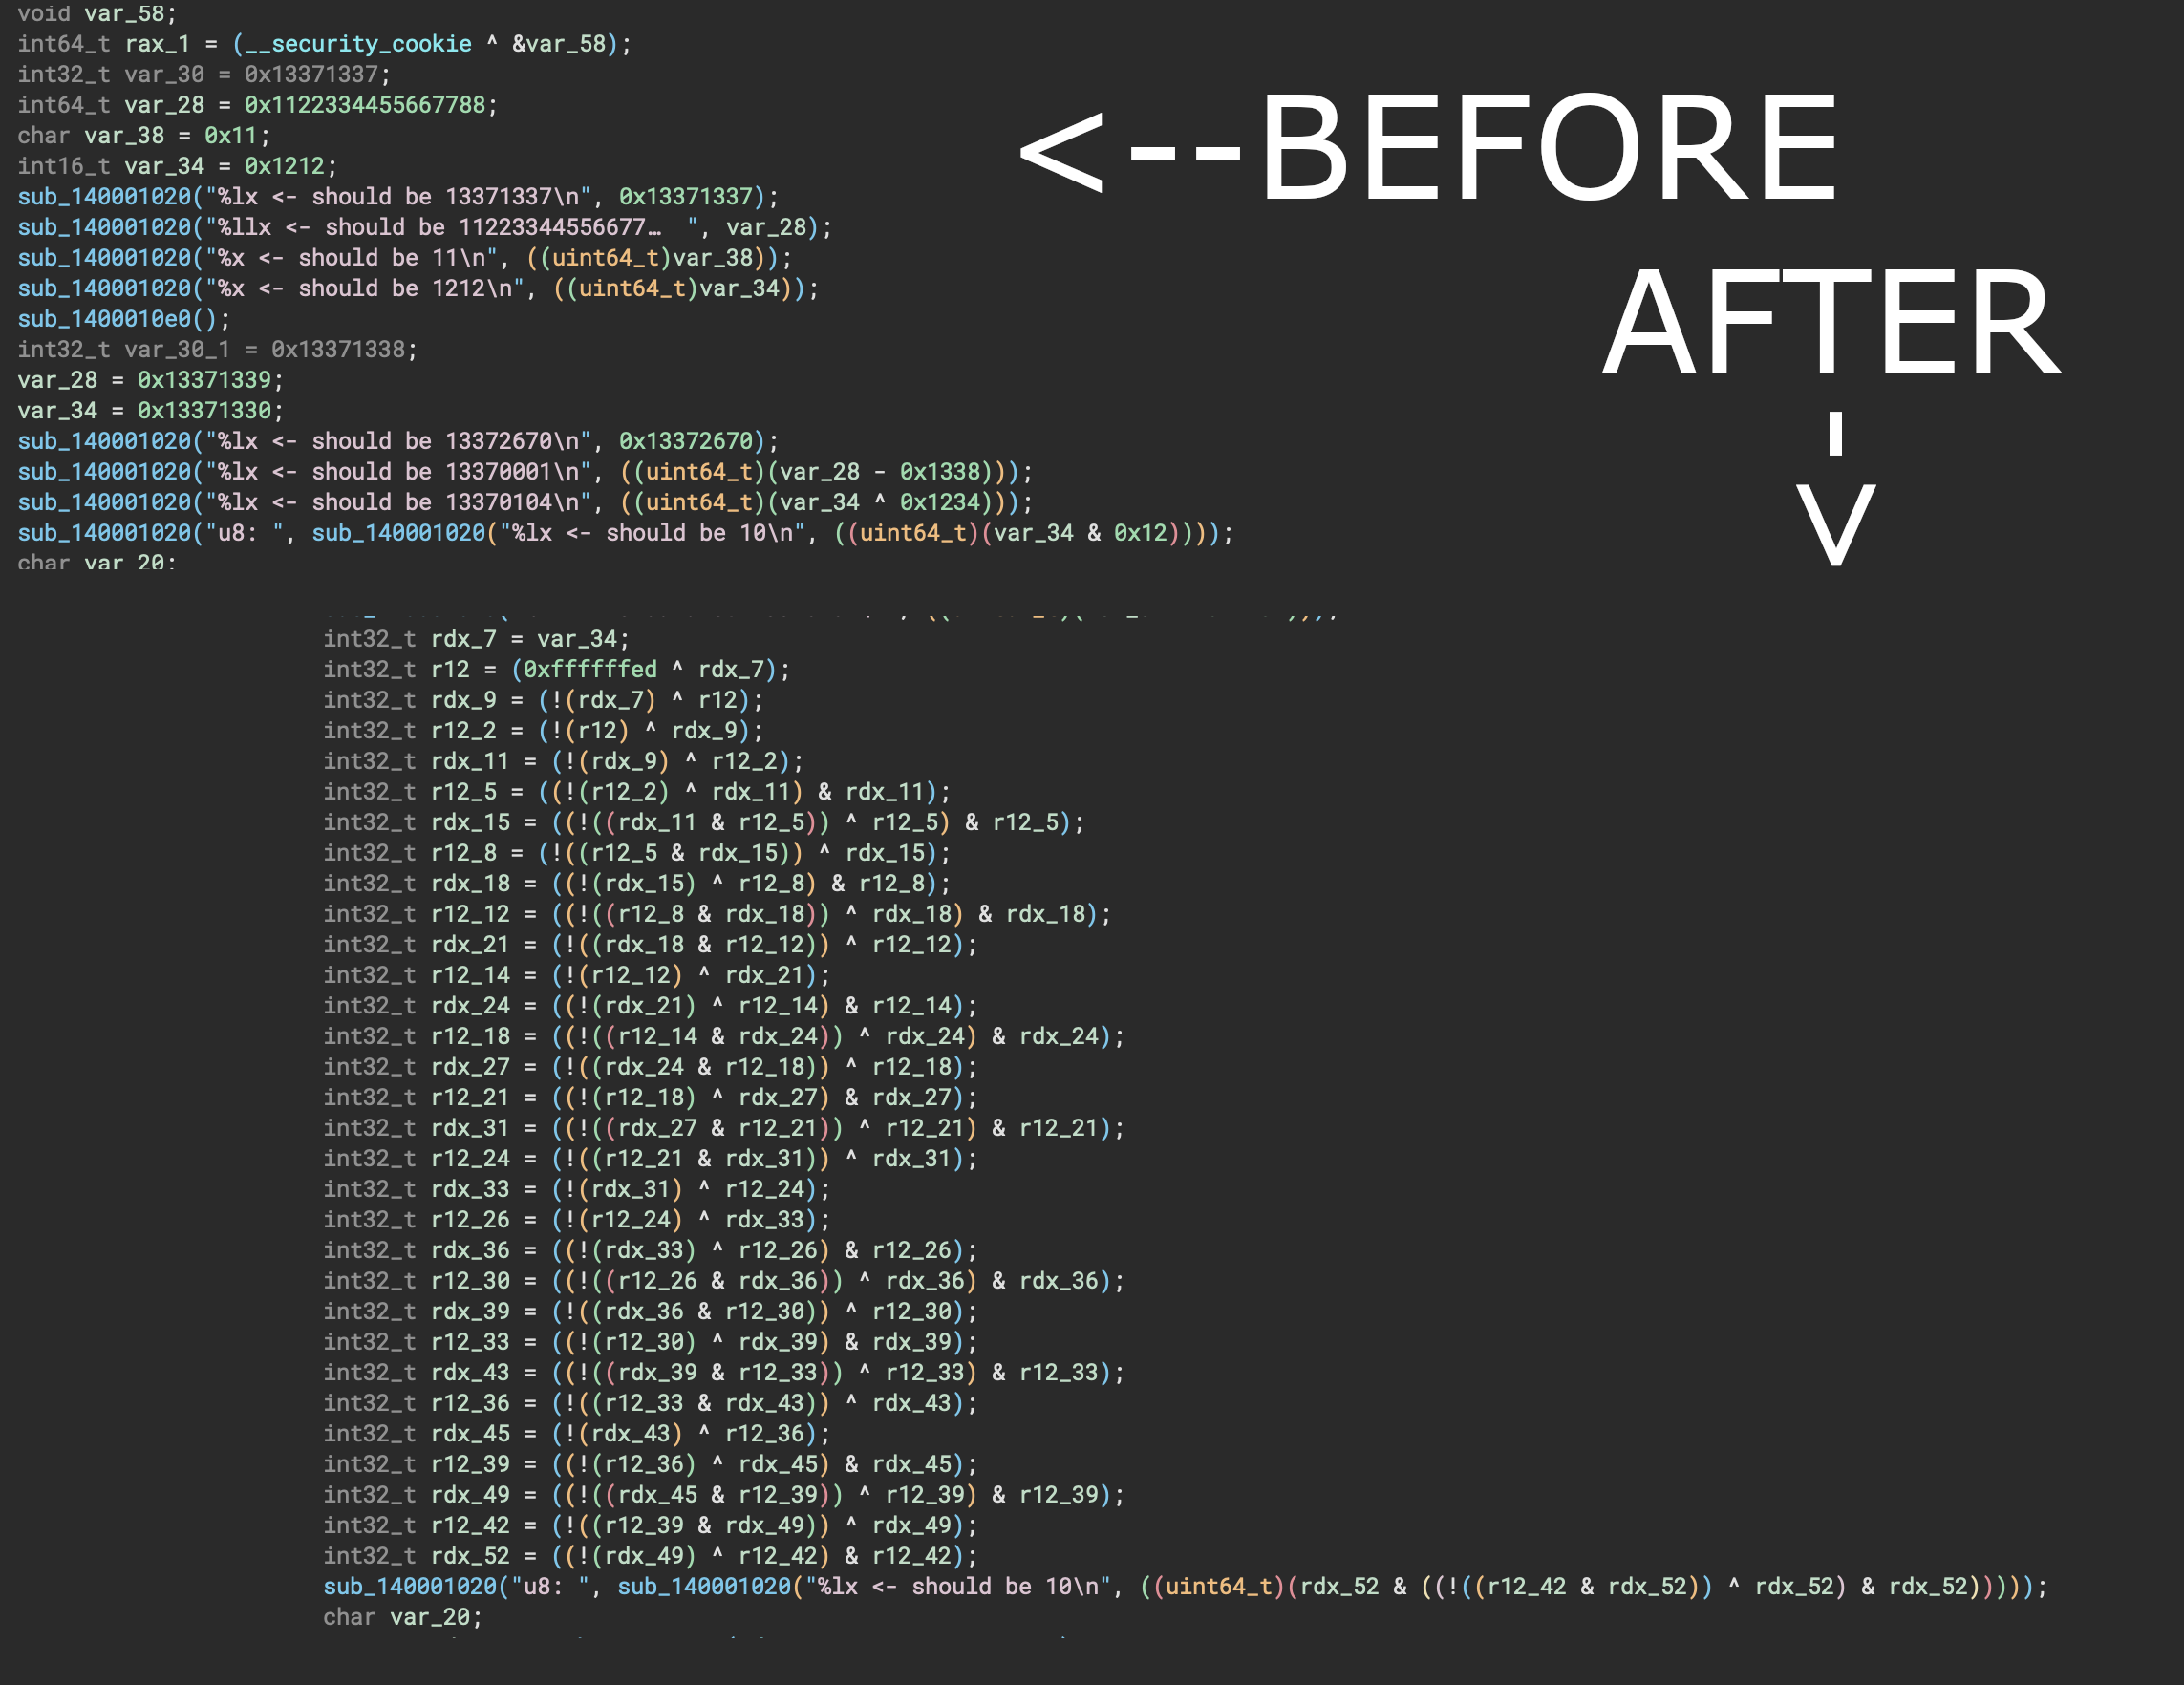
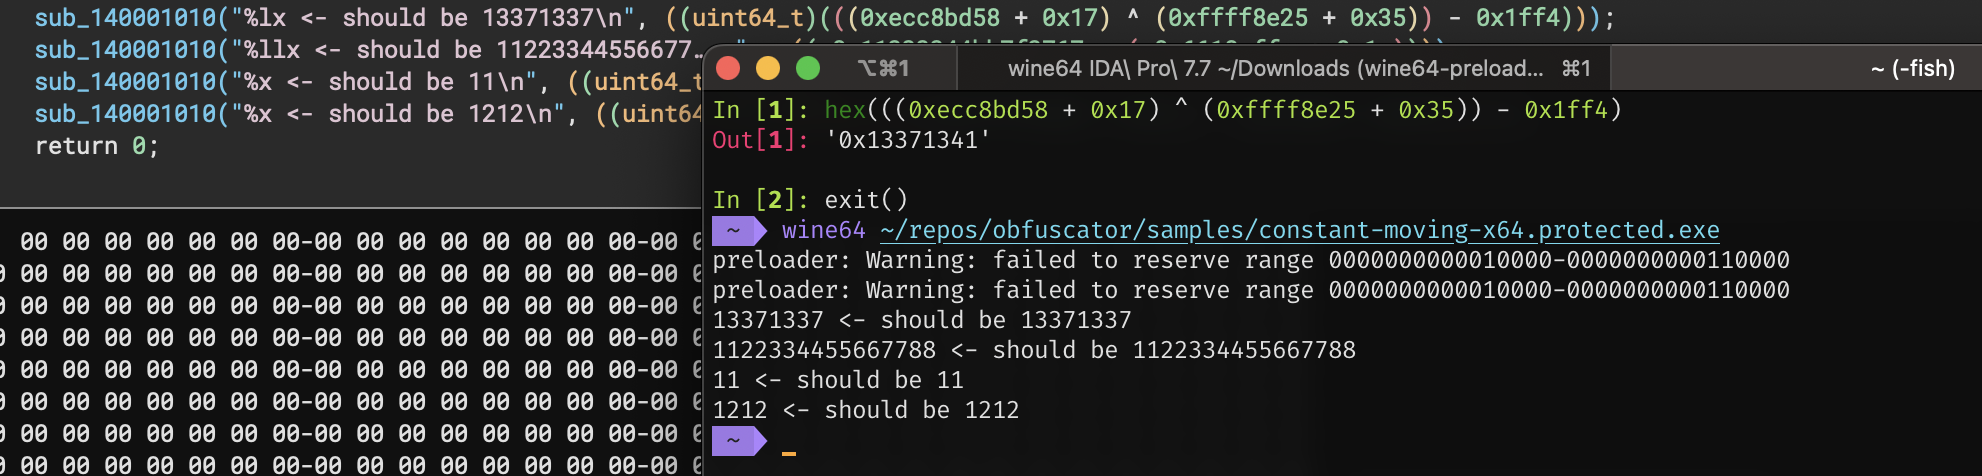
Constant encryption
An obfuscation that “encrypts” your constant immediate values (by using math expressions), and then decrypts it at the run time.
mathop was implemented exactly for this transform. We are using it to generate a random math expression, pass the immediate value to it, emulate it and then convert all the revert operations to a native code.
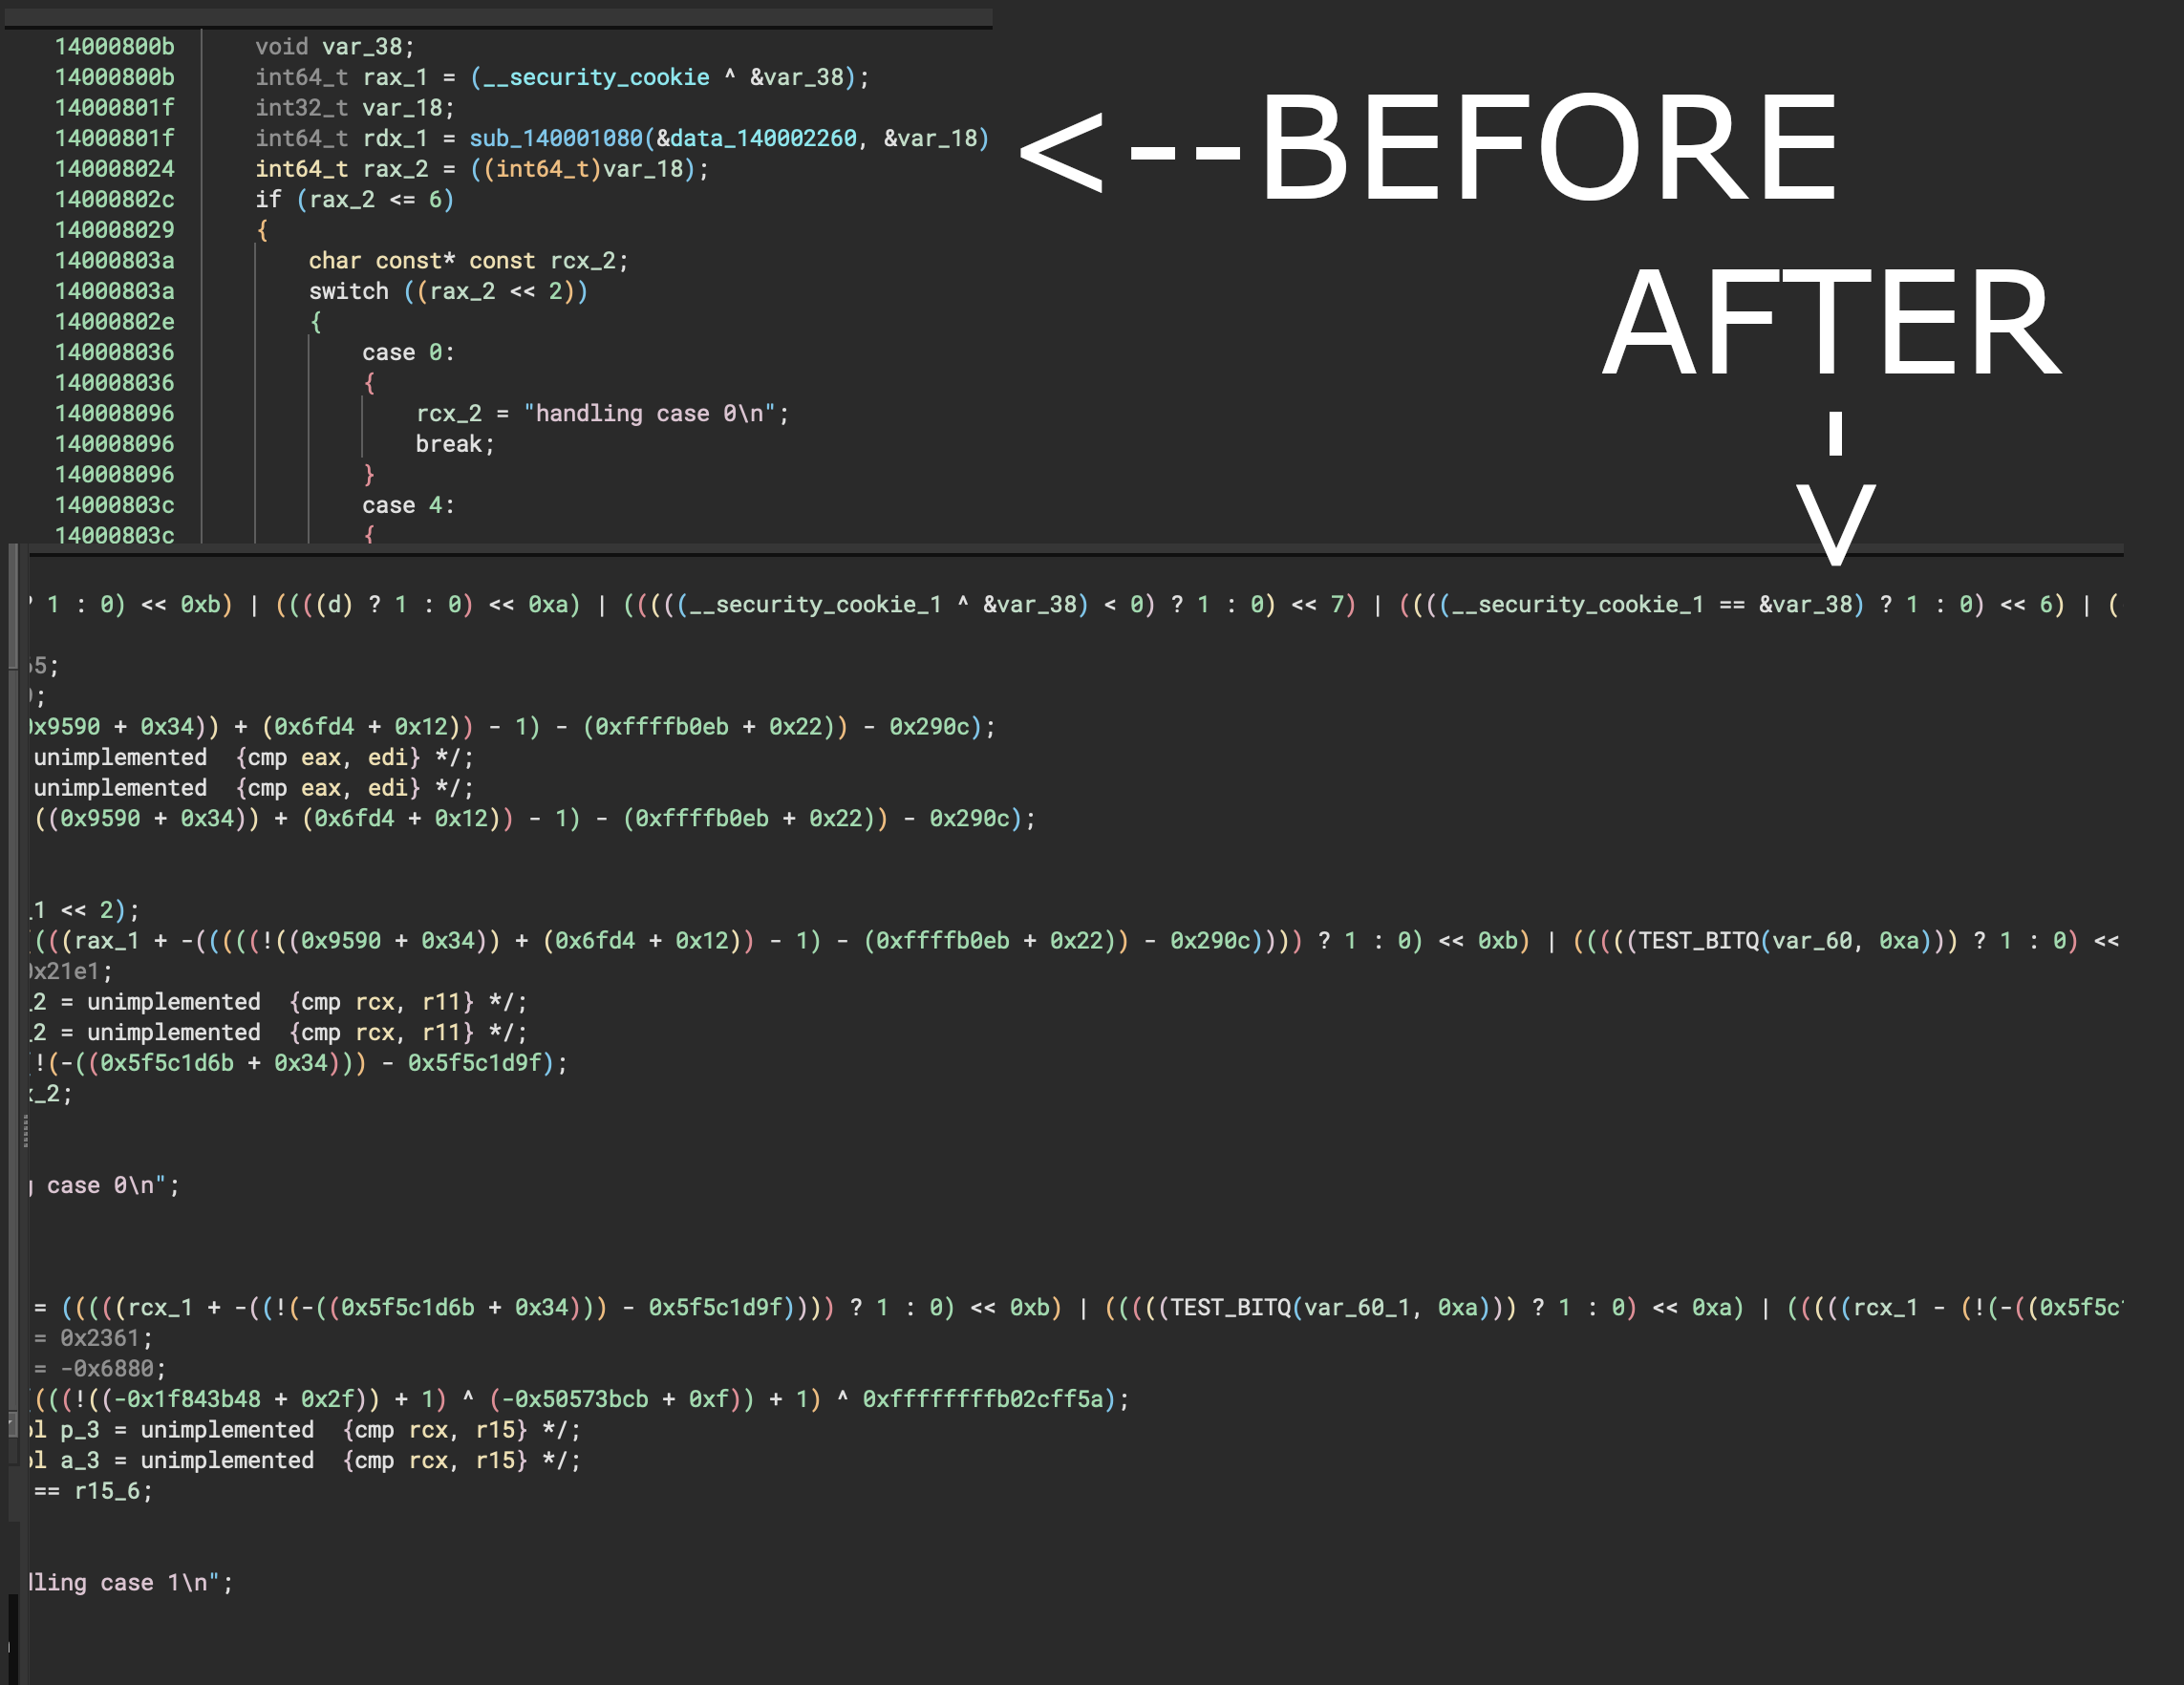
But by default, this is not enough, because in 2023 all decompilers have a symbolic execution and optimizations for such expressions and I was thinking about how to
Breaking IDA symbolic execution
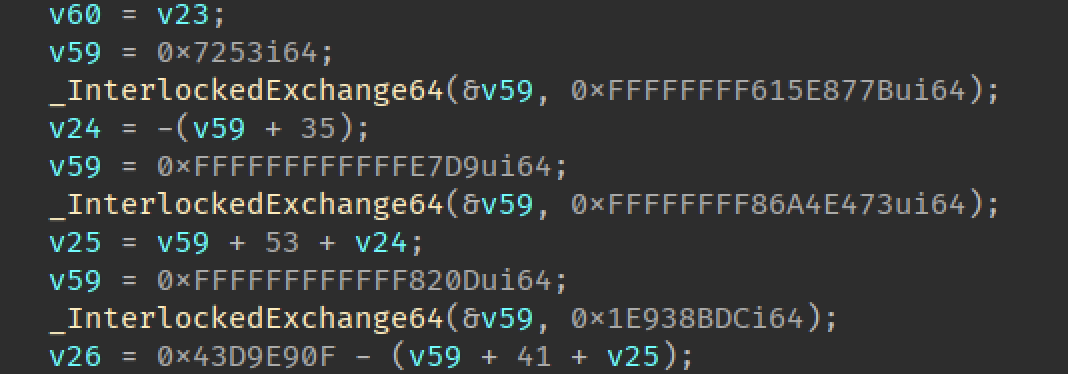
Breaking optimizations of this expression in IDA was easy enough, I just used xchg instructions to load variables on/from the stack and use it in the decryptions.
/// Operand decryption with xchg (unsupported in ida)
auto xchg_reencrypt_var = [&]<typename Ty>(Ty) -> void {
    /// Alloc some stack frame where the decrypted var would be stored at
    assembler->push(zasm::Imm(rnd::number<std::int16_t>()));
    /// Push encrypted constant
    assembler->mov(xchg_enc_holder->root_gp(), zasm::Imm(imm->value<Ty>()));
    assembler->push(xchg_enc_holder->root_gp());
    /// Pop the encrypted val
    assembler->pop(xchg_enc_holder->root_gp());
    /// Push it on stack with xchg operation
    assembler->xchg(qword_ptr(easm::sp_for_arch<Img>()), xchg_enc_holder->root_gp());
    /// Load to register
    assembler->pop(xchg_enc_holder->root_gp());
};
Breaking BInja symbolic execution
Breaking optimizations in binja was pretty tough(without using any CF tricks) so definitely a big shout out to Vector35.
Initially, it was optimizing all the things I tried and then I decided to change my approach.
The general idea when you’re trying to break a decompiler is to find a bug in its optimizations and/or microcode operations. To do that, I decided to try some uncommon x86 instructions. So I opened an x86 instruction set on wiki and the first one that I tried was ADC, which adds two registers and the carry flag value. And when I added this to the decryption stubs, binja suddenly stopped optimizing my math expressions! This was pretty cool but while observing its behavior I noticed that in its decompiled code it always writes a+b+0 without checking whether the carry flag was set to 0 or not. To break the decompilation on binja even more I decided to always set the carry flag to 1 and account it in my decryption stub. Which results in a+b+1, but binja would write it as a+b+0. Thus, the decompilation code is incorrect.
Breaking decompilers
Since we already broke the decompiler code generation in binja, it would be cool to also break the decompilation of any other popular decompilers.
To do that, there’s no general advice or something like this, you just have to try obscure things until it starts giving errors.
Funny enough, both of these tricks are kind of related, they all abuse the negative address ranges.
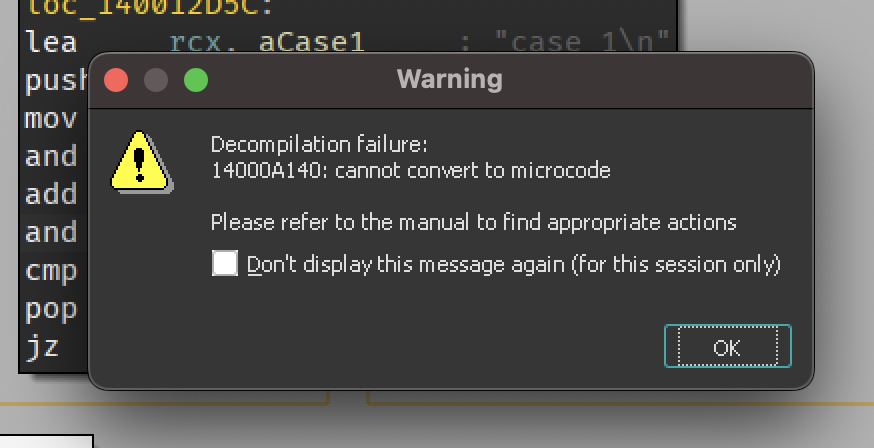
IDA
To achieve the IDA decompilation errors we can abuse the unhandled negative values in the ENTER instruction.
ENTER 0xFFFF, 0xFF
And this would give us a nice microcode exception while trying to decompile the function.
But of course, we can’t just append this instruction to any Basic Block as this would produce a crash on a bare metal too, not only when we decompile this function.
To “fix” that, I applied the same technique that I used for opaque predicates. It generates the same successor, inserts an opaque predicate, and inserts this instruction somewhere in the new BB that would never be executed because of the opaque predicate.
Ghidra
To cause decompilation errors we can force it to throw errors here by trying to access variable beyond the address map.
SymbolEntry *ScopeInternal::addMapInternal(Symbol *sym,uint4 exfl,const Address &addr,int4 off,int4 sz,
					   const RangeList &uselim)
{
  // Find or create the appropriate rangemap
  AddrSpace *spc = addr.getSpace();
  EntryMap *rangemap = maptable[spc->getIndex()];
  if (rangemap == (EntryMap *)0) {
    rangemap = new EntryMap();
    maptable[spc->getIndex()] = rangemap;
  }
  // Insert the new map
  SymbolEntry::inittype initdata(sym,exfl,addr.getSpace(),off,uselim);
  Address lastaddress = addr + (sz-1);
+ if (lastaddress.getOffset() < addr.getOffset()) {
+   string msg = "Symbol ";
+   msg += sym->getName();
+   msg += " extends beyond the end of the address space";
+   throw LowlevelError(msg);
+ }

  list<SymbolEntry>::iterator iter = rangemap->insert(initdata,addr.getOffset(),lastaddress.getOffset());
  // Store reference to map in symbol
  sym->mapentry.push_back(iter);
  if (sz == sym->type->getSize()) {
    sym->wholeCount += 1;
    if (sym->wholeCount == 2)
      multiEntrySet.insert(sym);
  }
  return &(*iter);
}
Achieving this is easy enough, all we have to do is dereference something at -1.
mov     r13, 0xffffffffffffffff
lea     r13, [r13]
mov     r8, qword [r13]

Producing output binary
At this point, all the transforms have been already applied and the only thing that we need to do is to link the function code, erase the original code and produce an output binary.
Linking
Before linking, the obfuscator estimates the whole code size of all obfuscated functions and creates a new READ/EXECUTE PE section.
Then, when we know the base address of the new section, we can start linking obfuscated functions.
This process is actually way easier than I thought it would be, because of how good zasm is. The only thing I needed to do was to just call some functions to encode the program and it even gave me the list of relocations!
Rebuilding PE
PE rebuilding was a bit harder than linking because it required me to write all the code by myself.
After all the previous stages we already have all the parsed PE information and all the new sections, all we need to do is create an output PE file.
Relocations update
Before updating relocations, it might be a good thing to erase previous ones and erase the whole section that contains it(if needed). To do that, we have to iterate through all the sections of the PE and find the one that contains relocations. Afterward, we need to fill it with zeroes and check whether we filled all sections with zeros.
Now, we need to assemble the new relocations to our new section with relocations. This is quite trivial because all we need to do is sort them by their base RVAs and then just serialize them as uint16_t.
Header initialization
Before copying all the sections, we have to initialize the PE header, update its size, and reserve a new buffer size.
That’s pretty much what it’s doing with buffer at this stage.
Copy sections
Now, we need to reassemble all the sections. To do that we just iterate through all stored sections and just copy their data at their raw_ptr.
Afterward, it is crucial to assemble new section headers, as that is what OS is using to identify sections. I don’t want to go into much detail about how it’s implemented because it’s very trivial and the code is self-explanatory.
Checksum update
To keep track of the consistency of the PE image, there’s a Checksum field in the PE header. Which is calculated by adding all the uint16_t chunks of the PE header. You can refer to the linux-pe sources to check the implementation of this algorithm.
All processes are complete! Now, write the output binary to the disk and exit.
Why this project is better
In the preface, I said that some existing public bin2bin obfuscators are not well-designed and have limited scalability. This implies that my project, in contrast, has better scalability, and this is indeed the case.
If we compare the current state of the obfuscator to other publicly available open-source similar projects, we can see that most of these projects are missing a lot of the crucial analysis parts, even BB decomposition which is needed for a lot of CF transforms. As a result, adding new features to these projects wouldn’t be as straightforward.
In terms of features, the alternatives might surpass my project. However, this gap of features could be filled, and re-implementing all of these common features in my obfuscator wouldn’t require much effort due to the efficient design of its core.
While my project isn’t perfect and lacks many features and analysis features, making it non-competitive with leaders of this market like Themida or VMProtect, I believe it serves as a solid foundation for further development and could potentially grow into something much larger.
Plans for the future
The only plan for the future is to complete the tests that I started writing but didn’t have time to finish due to time constraints.
After completing the tests, I will likely start improving the analysis and/or transforms. We’ll see how it goes.
Final words
That’s it for the first part of this series. You can follow the development of this project on its GitHub Repo (stars and PRs are welcome) or on my Twitter. I have quite a lot of ideas that I want to implement before writing and releasing the second part, so it may take some time.
Acronyms
| Short form | Description |
|---|---|
| ASLR | Address Space Layout Randomization |
| BB or Basic Block | A sequence of instructions with no branches except into the block and out of the block |
| CF | Control Flow |
| Disasm | Disassembler, a tool that converts machine code into assembly language |
| ELF | Executable and Linkable Format, a common file format for executables, object code, shared libraries, and core dumps in Unix systems |
| EFLAGS | Extended Flags Register in x86 architecture |
| GCC | GNU Compiler Collection, a set of compilers for various programming languages |
| GP | General Purpose (commonly referring to GP registers in computing) |
| IP | Instruction Pointer, a register that stores the address of the next instruction to be executed |
| JCC | Jump if Condition is met (Conditional Jump) |
| JE | Jump if Equal |
| JMP | Unconditional Jump instruction |
| JNE | Jump if Not Equal |
| JNZ | Jump if Not Zero |
| JZ | Jump if Zero |
| JumpTable | A method used in programming to jump to code based on the value of an index, especially in switch statements |
| MAP | Memory Allocation Map or Module Address Plan |
| MSVC | Microsoft Visual C++, an integrated development environment product from Microsoft |
| Operand | A value (an argument) on which the instruction, named by mnemonic, operates |
| PDB | Program Database, a proprietary file format (developed by Microsoft) for storing debugging information |
| PE | Portable Executable, a file format for executables, object code, and DLLs in 32-bit and 64-bit versions of Windows operating systems |
| RET | Return instruction in assembly language |
| RIP | Register Instruction Pointer in x86-64 architecture |
| RVA | Relative Virtual Address |
| Root GP | Root of General Purpose, often referring to the base of general-purpose operations or registers |
| SP | Stack Pointer, a special purpose register that points to the top of the stack |
| WinAPI | Windows Application Programming Interface, a core set of Microsoft’s APIs available in the Microsoft Windows operating systems |
| Assembler | A program that converts assembly language into machine code |
| bin2bin | Short for binary to binary, typically referring to transformations or translations between binary forms |
| demangler | A tool used to convert mangled names back to their original form in programming |
| dereference | The process of accessing the value that a pointer refers to in programming |
| disassemble | The process of converting machine code into assembly code |
| disassembling | The act of breaking down compiled byte code back into a more readable format (such as assembly language) |
| opaque predicate | A predicate in decision-making code whose truth value is always known at compile time, used in obfuscation |
| predecessors | Elements or nodes in a computational construct that come before a given element in a sequence or structure |
| reverse engineering | The process of deconstructing a man-made object to reveal its designs, architecture, or to extract knowledge from the object |
| successors | Elements or nodes in a computational construct that come after a given element in a sequence or structure |
| tautologies | Statements that are true in every possible interpretation in formal logic |